I'm nuts to even consider this, but my yarn stash is making noises that I can't completely ignore. It's whispering about the lace weight merino yarn I got from knitpicks a while back, and about what can be done with said yarn. It's whispering about sweaters. Granted, lace weight yarn is probably better used for fuzzy shawls, or doubled and used for socks; it's still whispering about sweaters. This is a puzzle to which I shall apply myself after I finish puzzling out the stripey foot of that Nordic Lights sock.
I've hit a snag, which I mentioned in my response to Rachael's comment: My little Brittany birch needles are too short to do what I need to do. It's a problem, but it gives me an excuse to consider ordering some of those nifty new wooden Harmony DPNs from KnitPicks. There's a further problem, though, because apparently the demand for the needles has been so unexpectedly high that the company has run out... and they won't be in stock until 22nd of October. I'd so hoped to finish the socks by then! Doesn't look like I'll be able to do that, though--especially since I do need longer needles.
The other problem is a purely technical one: I have yet to figure out how the needles are numbered for the heel gusset, which makes it a hell of a lot harder to do the stripe pattern. Of course, I could just finish the sock with a plain foot and just work the snowflake diagram and the toe according to pattern and completely ignore the stripes. At present I'm considering it a frustrating challenge, mostly because I really would like to figure out how to finish the sock without taking any shortcuts. On the other hand, I'd really like to finish the sock... and then finish the other sock. Not because I want to get it over with, but because I really want to be able to wear them! I know, I know... they'll be under shoes, which means no one will actually be able to see them. That doesn't matter, though, because I'll know they're there.
And I still need to figure out my holiday knitting schedule. I know of one person who's destined for mittens, and I know what I'm doing for one other person, but that still leaves a few people to plan for. Somewhere along the line, I'll be working on ideas for this lace weight sweater.. assuming I don't decide to double the yarn and do it as fingering weight, which--using the requisite small sized needles--could easily take F O R E V E R.
See why I said it sounds nuts?
Dammit.. I broke one of my teeny-tiny little Brittany needles. Now I really do need to order some from KnitPicks.

Monday, October 15, 2007

Cornbread's a-poppin'
Another comfort food post. Not for me, this batch of cornbread, but for mom who's suffering sinus nastiness due to the amount of leaf mold and ragweed pollen floating around; while cornbread doesn't seem like comfort food to me, it's what she asked for, so here it is.

Comforting Cornbread:
1 cup cornmeal
1.5 cups all purpose flour
2 tsp baking powder
1/2 tsp baking soda
1/2 tsp salt
2 large eggs
3/4 cup skim milk
1/4 cup sour cream
1 stick unsalted butter, melted
1/4 cup brown sugar
3/4 cup frozen corn, thawed and rinsed
1. In a mixing bowl, whisk flour, cornmeal, baking powder, baking soda, and salt. Preheat the oven to 400 degrees and move one the racks to the centermost position.
2. In a food processor, mix milk, eggs, brown sugar, butter, sour cream, and corn; pulse for a few seconds until things are evenly distributed, but make sure you don't overdo it, 'cause you still want corn kernels to be lumpy.
3. Pour the wet ingredients into the dry and fold until the ingredients are combined and moist. 4. Turn the mixture out into an 8x8, greased baking pan and bake at 400 degrees for 25 minutes, or until a toothpick comes out clean.
Saturday, October 13, 2007
Out and About
Today was just so gorgeous: blue skies, sunlight, cooler air, the clouds of dust rising from the local soybean fields as harvesters go to and fro...
Between rounds of Nordic Lights sock, I drove mom around the countryside so she could take pictures of the landscape and other things, including combines harvesting fields of soybeans. Here be pictures:
http://www.flickr.com/gp/11034038@N06/wzV3k8
And here be sock:
Between rounds of Nordic Lights sock, I drove mom around the countryside so she could take pictures of the landscape and other things, including combines harvesting fields of soybeans. Here be pictures:
http://www.flickr.com/gp/11034038@N06/wzV3k8
And here be sock:
Wednesday, October 10, 2007
Struthio camelus mortuus est

On Halloween of 2006, in a field in San Mateo County, Gaylord was taken from us when a pair of youths decided it would be fun to pester a dignified gentleman of middle years. Hatched in 1996, Gaylord attended Half Moon Bay Arts Academy and later went on to earn an applied arts degree in modern dance through the prestigious Ostrich Correspondence School, located in Los Angeles.
Well known for his curmudgeonly demeanor, Gaylord will be remembered for his grace and artistic approach to life, as well as the way he cared for his home and family, and for his love of local produce. A frequent shopper at the farmer's market, he was most often seen browsing through bins of tomatoes, apples, and brussles sprouts, which he greatly enjoyed sharing with his family.
Gaylord is survived by his two spouses, Apple and Tomato.
A memorial service is planned for November 10 at 1 PM, at St. James Cemetery; a small gathering will be held at the home of Apple and Tomato immediately following the service. Anyone wishing to honor Gaylord's memory may do so by making contributions to the Gaylord Memorial Fund.
Note: This obituary is in not meant to be offensive in any way. Sincere condolences and apologies to Tomato, Apple, their caretaker, and, of course, Gaylord. And shame, shame, shame on the young men who killed him! Further proof that gun control is indeed an excellent idea.
Tuesday, October 9, 2007
Bagel Bread
What with boiling, cornmeal, shaping, and egg wash, baking bagels is a fairly labor intensive process. It's definitely worth the trouble if you feel like going through all the steps, but if you're a bit shorter on time and energy, it's possible to get good bread using bagel dough.
Basic Bagel Recipe:
3 cups all purpose flour
1.5 tsp sea salt
1 tbsp sugar
1 tbsp maple syrup
1 tbsp vegetable oil
1 packet dry active yeast
1 cup hot water (120 degrees) plus about an ounce to adjust the consistency
1 egg white mixed with a little water (optional)
sesame seeds (optional)
1. Mix the dry ingredients--including yeast--in a large bowl; whisk to make sure everything is distributed evenly.
2. In a measuring cup, place the maple syrup and oil. Pour in the hot water and stick a candy thermometer in, just to make sure the temp is where it needs to be. When the temp reaches 120, begin adding the liquid to the flour mixture and start mixing. I cheat and take advantage of Davros' dough hook, thus eliminating all the kneading and mixing.
Note: Bagel dough is sticky by nature, so don't panic if it seems stickier than normal bread dough.
3. When the dough is completely mixed, shape it into a ball and put it in an oiled bowl to rise. Make sure to cover the bowl with plastic wrap or a clean dishcloth. Let it sit for about an hour before you punch it down.
4. Preheat the oven to 350 degrees and punch down the dough. Shape it according to the dimensions of your bread pan, which you'll want to grease lightly with either cooking spray or a little bit of vegetable oil (not too much...). Put the dough in the pan and cover with the plastic wrap so it can rest for about 15 minutes or so.
5. Mix the egg white with water and use it to paint the top of the loaf, then sprinkle with sesame seeds (or whatever you happen to prefer).
6. Bake at 350 for 40 minutes, then let it cool in the pan before you turn it out.
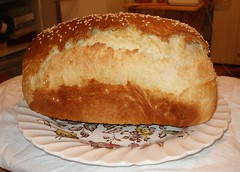
Basic Bagel Recipe:
3 cups all purpose flour
1.5 tsp sea salt
1 tbsp sugar
1 tbsp maple syrup
1 tbsp vegetable oil
1 packet dry active yeast
1 cup hot water (120 degrees) plus about an ounce to adjust the consistency
1 egg white mixed with a little water (optional)
sesame seeds (optional)
1. Mix the dry ingredients--including yeast--in a large bowl; whisk to make sure everything is distributed evenly.
2. In a measuring cup, place the maple syrup and oil. Pour in the hot water and stick a candy thermometer in, just to make sure the temp is where it needs to be. When the temp reaches 120, begin adding the liquid to the flour mixture and start mixing. I cheat and take advantage of Davros' dough hook, thus eliminating all the kneading and mixing.
Note: Bagel dough is sticky by nature, so don't panic if it seems stickier than normal bread dough.
3. When the dough is completely mixed, shape it into a ball and put it in an oiled bowl to rise. Make sure to cover the bowl with plastic wrap or a clean dishcloth. Let it sit for about an hour before you punch it down.
4. Preheat the oven to 350 degrees and punch down the dough. Shape it according to the dimensions of your bread pan, which you'll want to grease lightly with either cooking spray or a little bit of vegetable oil (not too much...). Put the dough in the pan and cover with the plastic wrap so it can rest for about 15 minutes or so.
5. Mix the egg white with water and use it to paint the top of the loaf, then sprinkle with sesame seeds (or whatever you happen to prefer).
6. Bake at 350 for 40 minutes, then let it cool in the pan before you turn it out.
Monday, October 8, 2007
Hee!

You appear to be a Knitting Guru. You love knitting and do it all the time. While finishing a piece is the plan, you still love the process, and can't imagine a day going by without giving some time to your yarn. Packing for vacation involves leaving ample space for the stash and supplies. It can be hard to tell where the yarn ends and you begin.http://marniemaclean.com
Take this quiz!
Sunday, October 7, 2007
Snowflake Cardigan Pattern (finally finished)
It's turning into a big deal, this cardigan thing. So far I'm pretty pleased with the progress I'm making, even though the pattern is still in its beta-testing stage; I'm leaning on Ann Budd's "The Knitter's Handy Book of Sweater Patterns" quite a bit, which helps. Set-in sleeves aren't particularly difficult, but there's some seaming involved--at the shoulders and along the sides, as well as making the sleeve seams before you attach the sleeves to the rest of the sweater. Oh.. and buttons, of course. Sleeves are optional, especially if you're after the oh-so-stealthy sweater-vest critter.
Snowflake Cardigan- 48" chest
Materials-
Size 8 circular needles 32"; size 8 circular needles 60" to pick up those stitches 'round the front
Knit Picks Wool of the Andes Winter Night- 20 balls (MC)-- or whatever worsted weight wool yarn you care to substitute
Knit Picks Wool of the Andes Cloud- 1 ball (CC)-- same as above: substitutions welcome and encouraged, as long as it's worsted
Stitch markers
Row counter
Tapestry needle
Some safety pins to help with seams
6 buttons
Gauge- 5 st/inch
Back: CO 120 stitches. Work in 2x2 rib for two inches, then switch to stst and work for one inch. Work Fair Isle pattern with CC for nine rows, then switch back to MC and work evenly in stst until piece measures 16" from CO edge. Place markers to indicate beginning of armhole edges and continue working until armholes measure 11". BO all sts and place markers to indicate first and last 40 st.
Left Front: CO 60 stitches. Work in 2x2 rib for 2 inches, then switch to stst and work for one inch. Work Fair Isle pattern with CC, then resume working with MC until piece measures 16" from CO edge. PM to indicae beginning of armhole edge, then work until armhole measures 3". Decrease 1 st at neck edge (end of every RS row) 17 times; then dec. 1 st every 4 rows 3 times-- 40 stitches remain. Work evenly in stst until piece measures the same length as the back (27 inches from CO edge), then BO all sts.
Right Front: CO 60 sts. Work in 2x2 rib for 2 inches, then switch to stst and work for one inch. Work Fair Isle pattern with CC, then resume working with MC until piece measures 16" from CO edge. PM to indicae beginning of armhole edge, then work until armhole measures 3". Decrease 1 st at neck edge (beginning of every WS row) 17 times; then dec. 1 st every 4 rows 3 times-- 40 stitches remain. Work evenly in stst until piece measures the same length as the back (27 inches from CO edge), then BO all sts.
Sleeves: Make two. CO 54 stitches and work 1x1 rib for 2 inches. Start working in stst and increase 1 stitch at the beginning and end of the needle every 2 rows three 3 times. (This gives you 60 stitches.) Then increase 1 stitch at the beginning and end of every needle every 4 rows 30 times. (This gives you 120 stitches). Continue working evenly--if necessary--until piece measures 22 1/2 inches. BO all stitches and cut yarn, leaving a tail that's about three feet long; you can use this to sew up the seam. Turn the work so the wrong side is facing out and safety pin the edges together. Thread the tapestry needle with the long tail and use this to stitch up the seam, and weave in the end of the tail. Do this for both sleeves.
Finishing: Here's the tricky part. I always hate picking up stitches; some people recommend using needles that are a couple sizes smaller to do it.
Button band-With the right side of the work facing you, start at the left-hand side of the neckline and pick up stitches all the way around the edge of the neckline and all the way down the right-hand edge (left front edge if you're knitting this for a woman). Work six rows of garter stitch and BO.
Note: If you want to do 2x2 ribbing, make sure to count carefully so that you have a number that's a multiple of 4.
Buttonhole band: Start picking up stitches the same way you did for the button band (this will be the left front edge for a man's sweater); this time it'll be from the bottom left end of the neckline.
Row 1- knit all stitches
Row 2- knit all stitches
Row 3- knit all stitchs, placing markers at intervals of 2.5" starting from the bottom edge. There should be 6 markers.
Row 4- *knit to marker, YO, k2tog. Repeat this for all the markers, then knit to the end of the row. The YO will give you a hole to use as a buttonhole.
Row 5- knit all stitches.
Row 6- BO all stitches and cut the yarn, leaving a tail about six inches long.
Use your tapestry needle and the tail to stitch up the gap between the end of the neck edge and the top of the buttonhole band.
Sew on the buttons at the appropriate spots on the button band, block the finished sweater, and enjoy it when the weather gets cold. Don't forget to sew a few pieces of yarn somewhere discreet, just in case your sweater decides it needs to have worn places repaired.

If anyone tries this and spots any problems that I've missed somewhere along the way, please let me know!

Snowflake Cardigan- 48" chest
Materials-
Size 8 circular needles 32"; size 8 circular needles 60" to pick up those stitches 'round the front
Knit Picks Wool of the Andes Winter Night- 20 balls (MC)-- or whatever worsted weight wool yarn you care to substitute
Knit Picks Wool of the Andes Cloud- 1 ball (CC)-- same as above: substitutions welcome and encouraged, as long as it's worsted
Stitch markers
Row counter
Tapestry needle
Some safety pins to help with seams
6 buttons
Gauge- 5 st/inch
Back: CO 120 stitches. Work in 2x2 rib for two inches, then switch to stst and work for one inch. Work Fair Isle pattern with CC for nine rows, then switch back to MC and work evenly in stst until piece measures 16" from CO edge. Place markers to indicate beginning of armhole edges and continue working until armholes measure 11". BO all sts and place markers to indicate first and last 40 st.
Left Front: CO 60 stitches. Work in 2x2 rib for 2 inches, then switch to stst and work for one inch. Work Fair Isle pattern with CC, then resume working with MC until piece measures 16" from CO edge. PM to indicae beginning of armhole edge, then work until armhole measures 3". Decrease 1 st at neck edge (end of every RS row) 17 times; then dec. 1 st every 4 rows 3 times-- 40 stitches remain. Work evenly in stst until piece measures the same length as the back (27 inches from CO edge), then BO all sts.
Right Front: CO 60 sts. Work in 2x2 rib for 2 inches, then switch to stst and work for one inch. Work Fair Isle pattern with CC, then resume working with MC until piece measures 16" from CO edge. PM to indicae beginning of armhole edge, then work until armhole measures 3". Decrease 1 st at neck edge (beginning of every WS row) 17 times; then dec. 1 st every 4 rows 3 times-- 40 stitches remain. Work evenly in stst until piece measures the same length as the back (27 inches from CO edge), then BO all sts.
Sleeves: Make two. CO 54 stitches and work 1x1 rib for 2 inches. Start working in stst and increase 1 stitch at the beginning and end of the needle every 2 rows three 3 times. (This gives you 60 stitches.) Then increase 1 stitch at the beginning and end of every needle every 4 rows 30 times. (This gives you 120 stitches). Continue working evenly--if necessary--until piece measures 22 1/2 inches. BO all stitches and cut yarn, leaving a tail that's about three feet long; you can use this to sew up the seam. Turn the work so the wrong side is facing out and safety pin the edges together. Thread the tapestry needle with the long tail and use this to stitch up the seam, and weave in the end of the tail. Do this for both sleeves.
Finishing: Here's the tricky part. I always hate picking up stitches; some people recommend using needles that are a couple sizes smaller to do it.
Button band-With the right side of the work facing you, start at the left-hand side of the neckline and pick up stitches all the way around the edge of the neckline and all the way down the right-hand edge (left front edge if you're knitting this for a woman). Work six rows of garter stitch and BO.
Note: If you want to do 2x2 ribbing, make sure to count carefully so that you have a number that's a multiple of 4.
Buttonhole band: Start picking up stitches the same way you did for the button band (this will be the left front edge for a man's sweater); this time it'll be from the bottom left end of the neckline.
Row 1- knit all stitches
Row 2- knit all stitches
Row 3- knit all stitchs, placing markers at intervals of 2.5" starting from the bottom edge. There should be 6 markers.
Row 4- *knit to marker, YO, k2tog. Repeat this for all the markers, then knit to the end of the row. The YO will give you a hole to use as a buttonhole.
Row 5- knit all stitches.
Row 6- BO all stitches and cut the yarn, leaving a tail about six inches long.
Use your tapestry needle and the tail to stitch up the gap between the end of the neck edge and the top of the buttonhole band.
Sew on the buttons at the appropriate spots on the button band, block the finished sweater, and enjoy it when the weather gets cold. Don't forget to sew a few pieces of yarn somewhere discreet, just in case your sweater decides it needs to have worn places repaired.

If anyone tries this and spots any problems that I've missed somewhere along the way, please let me know!
Thursday, October 4, 2007
Chicken Noodle Soup
1 package boneless, skinless chicken breasts, cooked and shredded into small pieces
6 cups chicken stock (rough guess.. you can probably use more if you want to make a bigger batch)
1 1/2 tsp sea salt (IF you think it needs it; canned stock is probably salty enough as it is)
1/2 tsp ground black pepper
2 sprigs rosemary
2 cloves garlic, smashed
4 oz sliced mushrooms
4 oz sliced carrots
4 oz green pepper, cut into small pieces
8 oz mini penne pasta
fresh parmesan cheese for grating over the bowls when you're ready to serve it.
1. Put the chicken stock, salt, pepper, rosemary, garlic, and shredded chicken in a large pot and bring to a simmer.
2. Add the carrots and pasta, and let cook until the pasta is almost cooked through, then add the rest of the vegetables. Continue cooking until the vegetables are tender and the pasta is completely cooked.
6 cups chicken stock (rough guess.. you can probably use more if you want to make a bigger batch)
1 1/2 tsp sea salt (IF you think it needs it; canned stock is probably salty enough as it is)
1/2 tsp ground black pepper
2 sprigs rosemary
2 cloves garlic, smashed
4 oz sliced mushrooms
4 oz sliced carrots
4 oz green pepper, cut into small pieces
8 oz mini penne pasta
fresh parmesan cheese for grating over the bowls when you're ready to serve it.
1. Put the chicken stock, salt, pepper, rosemary, garlic, and shredded chicken in a large pot and bring to a simmer.
2. Add the carrots and pasta, and let cook until the pasta is almost cooked through, then add the rest of the vegetables. Continue cooking until the vegetables are tender and the pasta is completely cooked.

Pumpkin Bread
Another recipe courtesy of the Tae-bean; once again, it's been tweaked and things have been added/substituted. I had fun making it, and even more fun eating it with some pumpkin ice cream. In my opinion there's no such thing as pumpkin overload. :P I'm looking forward to trying this again after the fairytale pumpkin finds its way to the blender.
4 cups of flour
3 tsp baking powder
1/2 tsp salt
4 eggs
1/2 cup vegetable oil
15 oz can pumpkin puree
1/4 tsp chai spices (my own mix of star anise, cloves, cinnamon, nutmeg, and cardamom)
1/4 tsp cinnamon
1/4 tsp nutmeg
pinch cayenne pepper
2 cups cider, reduced to 1/2 cup
1 oz rum
1 cup brown sugar, firmly packed
1 cup slivered almonds
1 cup raisins
- Let the cider simmer over medium heat until it's reduced to 1/2 cup, then set it aside to cool.
- Mix flour, spices, salt, nuts, and raisins in a large bowl and set aside.
- In a separate bowl, whisk eggs, pumpkin puree, oil, rum, brown sugar, and cider until completely smooth.
- Combine flour mixture and pumpkin mixture, divide into four small loaf pans (or two full-sized ones).
- Bake at 350 for 40 to 45 minutes, or until a skewer comes out clean.


Sunday, September 30, 2007
Nordic Lights
Now that autumn is really here, I thought it was time for another knitting challenge. Dad's cardigan is almost finished--I'll post the completed pattern as soon as I get a chance--and, while I still have mom's shawl to do, I'm pretty sure I can handle two projects at once. A few weeks back, I found a picture of a pair of socks called Nordic Lights. The pattern, which I found at an online magazine for handspinners, makes use of Scandinavian snowflake motifs and handspun yarn.
I'm not sure if it's really cheating, but since I'm not sure I'm a good enough spinner to do fingering weight without a huge struggle I've decided to use Mountain Colors BearFoot yarn instead. So far, it's going fairly well, but I wonder what size foot these socks were designed for! I wear a size 8/8.5, and these look like they'll be a bit smaller than that, even though I'm using needles that are two sizes bigger than those recommended in the pattern. We'll see how it turns out.
The colors aren't as bright as the picture makes them appear--Rosehip is a deep, variegated maroon/red combination, while Blue-green is more a peacock blue--so the pattern is turning out to be fairly subtle. It can only really be seen if the light hits it just right. Oh. Looks like I'll be able to write another yarn review once I finish the first sock!

On a more somber note, Doggie is getting old. She turned 7 in August; that's pretty old for a Dane. Now that she's in her twilight, she's begun having some minor problems. Not arthritis and diminished eye sight, as might be expected, but she's been having some digestive troubles brought on by a bacterial imbalance. Poor thing. It's something fixable, but it's uncomfortable for her--and for those of us *ahem* who are on duty in the yard.
For the past couple of years we've been feeding her cooked ground turkey, which the vet assures us is fine, as long as we don't overfeed her, along with her usual dry food. This has happened once before: she goes off her usual food and we have to jump through hoops to figure out what will be more palatable to her. Right now, by some strange quirk, it's canned dog food mixed with yogurt, served over rice cooked in chicken broth and.... Poor dog. I guess now that she's an old lady she deserves to be spoiled. But whoever heard of dogs eating chicken fried rice? It's not the oily kind of fried rice.. it's just cooked in a frying pan with a minimum of oil, a little bit of soy sauce, and shredded chicken, peas, carrots, and water chestnuts.
Of course, the cats are jealous because there's chicken involved. They'll almost commit murder to get bits of shredded chicken.
I'm not sure if it's really cheating, but since I'm not sure I'm a good enough spinner to do fingering weight without a huge struggle I've decided to use Mountain Colors BearFoot yarn instead. So far, it's going fairly well, but I wonder what size foot these socks were designed for! I wear a size 8/8.5, and these look like they'll be a bit smaller than that, even though I'm using needles that are two sizes bigger than those recommended in the pattern. We'll see how it turns out.
The colors aren't as bright as the picture makes them appear--Rosehip is a deep, variegated maroon/red combination, while Blue-green is more a peacock blue--so the pattern is turning out to be fairly subtle. It can only really be seen if the light hits it just right. Oh. Looks like I'll be able to write another yarn review once I finish the first sock!
On a more somber note, Doggie is getting old. She turned 7 in August; that's pretty old for a Dane. Now that she's in her twilight, she's begun having some minor problems. Not arthritis and diminished eye sight, as might be expected, but she's been having some digestive troubles brought on by a bacterial imbalance. Poor thing. It's something fixable, but it's uncomfortable for her--and for those of us *ahem* who are on duty in the yard.
For the past couple of years we've been feeding her cooked ground turkey, which the vet assures us is fine, as long as we don't overfeed her, along with her usual dry food. This has happened once before: she goes off her usual food and we have to jump through hoops to figure out what will be more palatable to her. Right now, by some strange quirk, it's canned dog food mixed with yogurt, served over rice cooked in chicken broth and.... Poor dog. I guess now that she's an old lady she deserves to be spoiled. But whoever heard of dogs eating chicken fried rice? It's not the oily kind of fried rice.. it's just cooked in a frying pan with a minimum of oil, a little bit of soy sauce, and shredded chicken, peas, carrots, and water chestnuts.
Of course, the cats are jealous because there's chicken involved. They'll almost commit murder to get bits of shredded chicken.
Subscribe to:
Posts (Atom)